Fits Focused Installations
The 16-inch cube profile is designed for small water-feature projects where a larger fountain basin would take up unnecessary space.


PROUDLY MADE IN THE USA
Compact fountain reservoir • Basin only
Create a clean, self-contained reservoir for a wall spout or small lightweight fountain in a compact 16-inch footprint. Made in Saginaw, Michigan, the PB1946 basin can be buried, concealed within a wall, or built around as a pedestal.
The 16-inch cube profile is designed for small water-feature projects where a larger fountain basin would take up unnecessary space.
Bury it as an underground reservoir, build around it to form a pedestal, or hide it behind or within a wall for a recirculating spout.
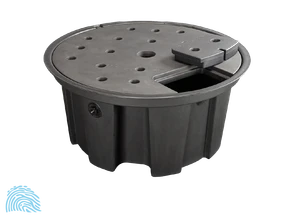
The removable cover, centered plumbing opening, side connection points and anti-splash mat support pump access and tidy hose routing.
| Basin | Dimensions | Capacity | Shape | Recommended application |
|---|---|---|---|---|
| Mini (PB1946) | 16" × 16" × 16" H | 12 gal. | Cube | Small lightweight fountains up to 12" high |
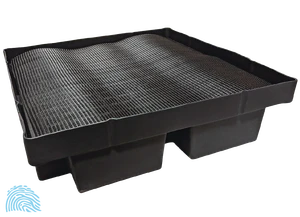
| 2×2 (LA2000) | 25" × 25" × 8" H | 12 gal. | Square | Smaller fountains with minimal water movement |
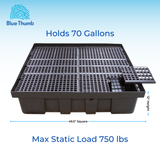
| 4×4 (LA4000) | 49.5" × 49.5" × 12" H | 70 gal. | Square | Fountains with minimal water movement |
| Medium GFRC (PB1953) | 30" × 34" × 14" H | 41 gal. | Hex | Lightweight fountains up to 24" high |
| Large GFRC (PB1960) | 40" × 46" × 14" H | 82 gal. | Hex | Lightweight fountains up to 36" high |
Dimensions: 16" × 16" × 16" H
Capacity: 12 gal.
Use: Small lightweight fountains up to 12" high
Dimensions: 25" × 25" × 8" H
Capacity: 12 gal.
Use: Smaller fountains with minimal water movement
Dimensions: 49.5" × 49.5" × 12" H
Capacity: 70 gal.
Use: Fountains with minimal water movement
Dimensions: 30" × 34" × 14" H
Capacity: 41 gal.
Use: Lightweight fountains up to 24" high
Dimensions: 40" × 46" × 14" H
Capacity: 82 gal.
Use: Lightweight fountains up to 36" high
Review the complete installation manual before digging. Pump and plumbing placement depends on the fountain or wall-spout configuration.
Step 1
Plan a viewing location with practical access to water and electricity. Mark an excavation approximately 3–4 inches wider than the basin and confirm the location of underground utilities before digging.
Step 2
Dig approximately 16 inches straight down. Remove sharp rocks and roots, then level and tamp a base of sand or small gravel so the basin sits solidly and level.
Step 3
Position the notched lip toward the power source. Check level in every direction, backfill carefully and compact the soil to prevent shifting. Leave a shallow trench for the pump cord.
Step 4
Clean debris from the basin. Connect the pump and plumbing, place the pump below the cover, and route the tube through the cover opening or plumbing Spinweld as required. Pump and plumbing are not included.
Step 5
Set the hard-plastic cover in place and position the anti-splash mat above it. Confirm that the cord and tubing are not pinched and that the pump remains accessible for service.
Step 6
Fill the basin until water nearly reaches the top. Start the pump and continue adding water until the complete system circulates without water loss. Keep the pump submerged during operation.
Check the water level regularly and never allow the pump to run dry. Water loss varies with evaporation, splash, wind and the fountain’s flow pattern.
Remove leaves and debris from the anti-splash mat and rinse it thoroughly. In spring and fall, clean accumulated debris from the basin and replace the water.
Remove and clean the pump, then store it submerged in water in a non-freezing area. Blue Thumb’s maintenance guide says to leave the buried basin about 50% full to reduce freeze-thaw heaving; winter damage is not covered by warranty.
Keep the installation guide available during site preparation and assembly. Use the maintenance guides for routine care and seasonal planning.
Blue Thumb’s Sales/Tech Team can help confirm basin size, fountain compatibility, pump and plumbing needs, and optional auto-fill equipment before you order.
No. This listing is for the Mini Fountain Cube Basin and its included cover, anti-splash mat and Spinweld plugs. The pump, plumbing, fountain or wall spout, auto-fill valve and finish materials are sold separately.
It is designed for compact wall-spout installations and small lightweight fountains. The current product guidance lists fountains up to 12 inches high; always follow the exact fountain or kit specifications before selecting a basin.
Yes. The installation guide shows it buried as an underground reservoir. It may also be built around as a pedestal or concealed behind or within a wall for a spout installation.
No. Pump, hose, fittings and discharge plumbing are selected for the complete fountain or wall-spout system and are not included with the basin-only PB1946 listing.
Yes. The basin includes an Auto Fill Spinweld connection. The compatible Fountain Basin Auto Fill Kit is optional and sold separately.
Do not assume compatibility based on dimensions alone. Blue Thumb directs heavier vase and real-stone pieces to appropriately sized AquaBox® basins. Confirm the fountain footprint, weight, point load and expected water movement before ordering.
The installation guide calls for a 16-inch-deep excavation marked approximately 3–4 inches wider than the basin. Allow additional working room for leveling, backfill, cord routing and the surrounding finish.
Remove and clean the pump, then store it in water where it will not freeze. Blue Thumb’s maintenance guide says to leave a buried basin about 50% full to help reduce movement during freeze-thaw cycles, then drain, clean and refill it in spring. Winterize the fountain or wall-spout components according to their own instructions.